HOW TO MAKE HOMEMADE SOAP FOR BEGINNERS USING NATURAL INGREDIENTS
HOW TO MAKE HOMEMADE SOAP FOR BEGINNERS USING NATURAL INGREDIENTS.
In this blog post I’m going to share with you how easy it is to make your own homemade soap at home, using only natural ingredients like Essential Oils!
I’m also sharing with you some Essential Oils blends recipes.
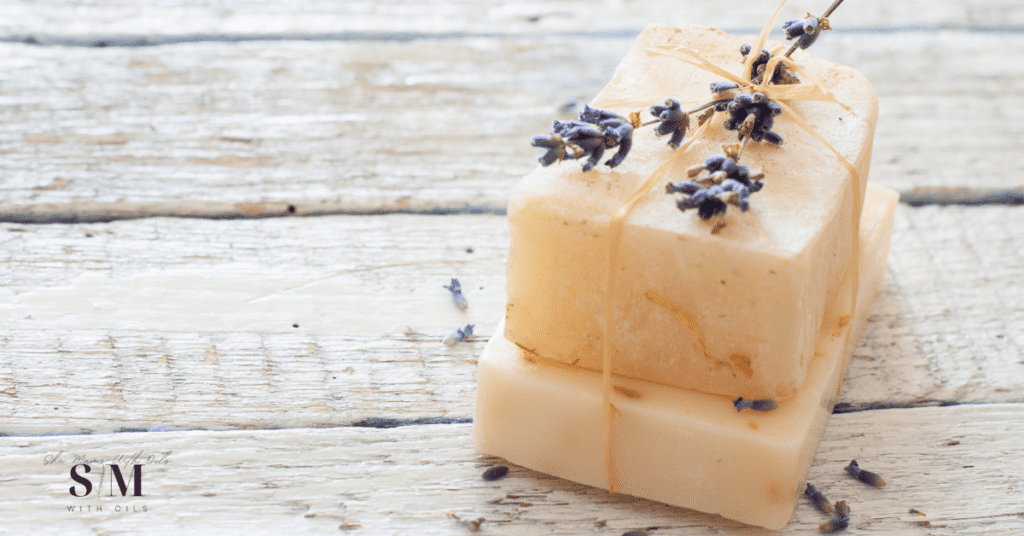
Learn the easy melt and pour method.
The following post contains affiliates, which means I’ll get a small commission if you decide to buy using the links provided. This will add NO EXTRA COST to you but it helps me to keep this blog up and running. Thank you. You can get more info by reading my Disclaimer page.
Have you ever thought about making your own soap but have never tried because you were afraid of using lye?
If the thought of having to use it makes you uncomfortable, then read on.
Subscribe to my YouTube Channel!
If you’d rather watch a video, you can watch on my Youtube channel!
Don’t forget to pin the post for later!
HOW TO MAKE HOMEMADE SOAP FOR BEGINNERS USING NATURAL INGREDIENTS: DO YOU HAVE TO USE LYE TO MAKE SOAP?
Lye is a vital ingredient when it comes to soap making, but it is caustic and can be dangerous if you handle it wrong.
I personally have not tried making soap using lye, and at the moment I am not even planning on doing it. I always have children around me and I just don’t feel it would be safe.
The good news is that, fortunately for us, there are other ways that we can make soap, without using lye.
And if you didn’t think it was possible, read on, and I’ll show you.
WHY YOU WANT TO MAKE HOMEMADE SOAP USING NATURAL INGREDIENTS
Making your own soap bars is a great way to express your artistic inclinations. It’s a fun and relaxing activity to do at home when you are free, or just to pass the time during a rainy afternoon.
But, there is so much more to soap making!
Once you try it, I promise you will never want to get commercial products in your local stores again.
MAKING HOMEMADE SOAP GIVES YOU CONTROL OVER THE INGREDIENTS USED
When you make your own soap, you have total control over the ingredients used, and can rest assured there are no hidden toxins and chemicals in it.
Your whole family can use your homemade products knowing that they are safe.
THE THREE METHODS OF MAKING HOMEMADE SOAP
There are three main methods to make homemade soap for beginners.
- Hot process soap method: this involves using lye and mixing it with water, fats and oils over heat till all ingredients are well combined and no lye is present any longer;
- Cold process soap making: similar to the first one but without using a heat source;
- Melt and pour: you need to buy a “melt and pour” base for your soap and you just melt it over heat and then shape it into soap bars.
THE MELT AND POUR METHOD: THE EASIEST WAY TO MAKE HOMEMADE SOAP FOR BEGINNERS USING NATURAL INGREDIENTS
Melt and pour is my favourite way of making soap and the only one I have ever tried so far.
It is so easy that I highly recommend it, especially if you are a beginner. Most importantly, this method doesn’t require any handling of lye. In fact, the base you buy will have already undergone the saponification process, and therefore there will be no lye left in it.
This is why I believe this is the safest method for making homemade soap for beginners.
Another added bonus: because the saponification process has already been completed on a melt and pour base, your homemade soap is ready to use as soon as it has hardened, and doesn’t need to be cured for a few weeks.
HOW TO MAKE SOAP WITH KIDS
Using a melt and pour base is also a great way to get the children involved in soap making, for a fun family activity.
You can use additional (but optional) ingredients to the soap such as flowers or glitter or colours. The kids will surely love to make their own, totally customised, soap bar!
Furthermore, you could plan ahead and organise a walk in the woods ahead of time to collect flowers or herbs that you could then dry at home and use when you are ready to make the soap bars.
HOW TO MAKE HOMEMADE SOAP FOR BEGINNERS USING NATURAL INGREDIENTS
In this post I’m going to guide you through the “melt and pour” method to make soap.
I’m going to show you the tools needed, and the natural ingredients you can use.
TOOLS AND INGREDIENTS YOU WILL NEED
- Melt and pour base of your choice;
- Shea butter, Vitamin E, Cocoa butter (optional), coconut oil, olive oil;
- Dried flowers, dried herbs, natural dye, glitter, oat flakes, coarse sea salt, etc. (optional);
- Essential oils of your choice;
- One large pot;
- A spoon;
- Silicone soap moulds
TYPES OF MELT AND POUR SOAP BASE
There are many different types of melt and pour soap bases on the market today. They are all inexpensive and readily available.
All soap bases contain a few main ingredients:
- Glycerin;
- Lye;
- Water;
- Oil.
Sadly, some companies add artificial ingredients to the mix, such as parabens, dyes and other harsh chemicals. Those ingredients can cause skin irritations and other health issues. That is why it is always best to buy from a reputable company and choose only soap bases that are 100% natural.
It is advisable that you familiarise yourself with some of them before purchasing one. This is why I’m going to show you a few of them.
Goat Milk Melt and Pour Soap Base
This melt and pour soap is a soft white soap that is made by blending real goat milk.
Goat milk is naturally homogenised. That is to say that its cream doesn’t sit on top of it, but it’s evenly present in the milk. This makes the goat milk base ideal when it comes to add extra ingredients, as they will naturally be distributed in the soap.
This melt and pour base is rich in vitamins, proteins and minerals that are all very beneficial to the skin. It is suitable for all skin types. However, it is particularly recommended for dry and mature skin, due to its moisturising properties.
Honey Melt and Pour Soap Base
Honey is rich in nutrients, vitamins and enzymes, all components that make it ideal for all skin types.
It provides moisturising and soothing, as well as antibacterial benefits.
Due to the presence of antioxidants in honey, this base can help in giving you a fresh, younger looking skin. In other words, this soap is recommended for mature and dry skin.
Glycerin Melt and Pour Soap Base
As mentioned above, all types of soap contain glycerin. However, this particular base has extra added glycerin to it, to give it a clear, almost translucent look.
Because of its appearance, glycerin soap base is ideal if you want to add extra fancy ingredients. For example, pressed flowers or natural dyes. They will be standing out quite easily, letting you express your artistic inclinations and making perfect gifts for loved ones.
Glycerin is well known to help in drawing water to the skin. Therefore, it makes this soap base suitable for all skin types.
Aloe Vera Melt and Pour Soap Base
Aloe vera is widely known for its incredible benefits:
- Soothes itchy and irritated skin,
- It is antibacterial,
- Has anti-inflammatory properties,
- Rich in minerals and antioxidants.
This soap base is clear like the glycerin one, making it very good to add fancy ingredients to it.
The Aloe vera soap is suitable for all skin types. It is particularly beneficial for those who suffer from acne and skin breakouts, due to its antibacterial properties.
Olive Oil Melt and Pour Soap Base
If you suffer from acne, psoriasis or eczema, then olive oil is your friend.
This base is rich in vitamins, antioxidants and monounsaturated fatty acids.
Olive oil can help with reducing inflammation caused by the above mentioned conditions.
It is also very good if you have sensitive skin.
Coconut White Melt and Pour Soap Base
Coconut oil is known for its cleansing and anti-microbial properties. It is recommended for all skin types, but it can be particularly helpful to those who suffer from skin breakouts and acne.
Oatmeal Melt and Pour Soap Base
Oatmeal is used in skin care products due to its exfoliating and soothing properties. It is very effective in calming an irritated skin, leaving it soft, younger looking and brighter.
Because of its many benefits, Oatmeal soap is ideal when used on your face, and can be used even by people with sensitive skin. It is also good for dry and mature skin.
Cocoa Butter Melt and Pour Soap Base
As a result of its chocolaty scent, this soap base is well loved by many, and why not? Rich in vitamins, it helps moisturising your skin, leaving it nice and soft and smelling yummy!
Cocoa butter soap base is suitable for all skin types.
Shea Butter Melt and Pour Soap Base
Shea butter is probably one of those ingredients we have all heard of before, as it is widely used in the cosmetic industry, to make skin care products as well as shampoos and body lotions.
It is derived from the nuts of the karite tree and it has a high vitamin content, making it a very good soap base for moisturising and nourishing your skin.
Shea butter soap is very good for dry and mature skin.
Castile Melt and Pour Soap Base
Castile Soap is one of my favourite natural ingredients to use around the home, and when it comes to personal care.
Derived only from natural ingredients, this soap will cleanse your skin without stripping it of its natural oils, leaving it clean, fresh and soft.
Packed with antibacterial properties, it can support your skin in order to fight acne and skin irritations. Suitable for all skin types.
HOW TO CHOOSE THE BEST MELT AND POUR SOAP BASE FOR YOU
You might want to consider what are the benefits you want to get from your own homemade soap, and what is your skin type before choosing a soap base.
Look for added, all natural ingredients like goat’s milk, olive oil, shea butter, cocoa butter or honey for example.
ESSENTIAL OILS IN SOAP MAKING
If you are making soap at home, I think you will want it to smell nice, right?
And if you want to avoid toxins and bad chemicals, you also want to stay clear from artificial fragrances!
That’s why using Essential Oils is so important when making homemade soap using natural ingredients!
ARTIFICIAL FRAGRANCES VERSUS ESSENTIAL OILS
You might be thinking that everyone wears perfumes and therefore they must be safe to use, right? Wrong!
Artificial fragrances, perfumes and fragrance oils can have extremely detrimental effects on the human body. They can cause allergic reactions, cancer and hormonal disruption.
WHY ARE ARTIFICIAL FRAGRANCES BAD FOR YOU?
“The dangers of synthetic scents aren’t always evident, but we have the science to prove that everyone, regardless of age or health, needs to make avoiding fake fragrances a major priority.
A National Academy of Sciences points out some vital facts: about 95 percent of chemicals used in synthetic fragrances are derived from petroleum (crude oil). They include benzene derivatives (carcinogenic), aldehydes, toluene and many other known toxic chemicals linked to cancer, birth defects, central nervous system disorders and allergic reactions. […] Some of the worst toxic ingredients used in lotions, shampoos, laundry detergents, cleaning products and so much more include synthetic scents, often listed on labels as the elusive “fragrance.” And many on the list are known or suspected endocrine disruptors, compounds that tinker with hormonal health that can trigger weight gain and even set you up for diseases decades down the line.
Avoiding the dangers of synthetic scents is crucial. […] When a company puts “fragrance” on the label, don’t be tricked. This is a catch-all term actually can stand for thousands of different ingredients (literally, at least 3,000). And when you use a product containing “fragrance” or “perfume,” all of those mysterious ingredients are absorbed right into your bloodstream. […] Regardless of your age or health status, it is imperative that you avoid fragrance chemicals”.
THE AROMATIC BENEFITS OF ESSENTIAL OILS
If you want to scent your homemade soap using natural ingredients, Essential Oils are most definitively the best option for you.
Essential Oils are natural plant extracts and therefore they contain no hidden ingredients, and are safe to use around your family.
Not only that, but they will provide you with additional benefits for your skin when applied topically, and for your general wellbeing through their aromatic power.
ARE YOU INTERESTED IN LEARNING HOW TO USE ESSENTIAL OILS IN YOUR DAILY ROUTINE BUT DON’T KNOW WHERE TO START? DOWNLOAD NOW MY COMPLETE BEGINNERS GUIDE TO ESSENTIAL OILS!
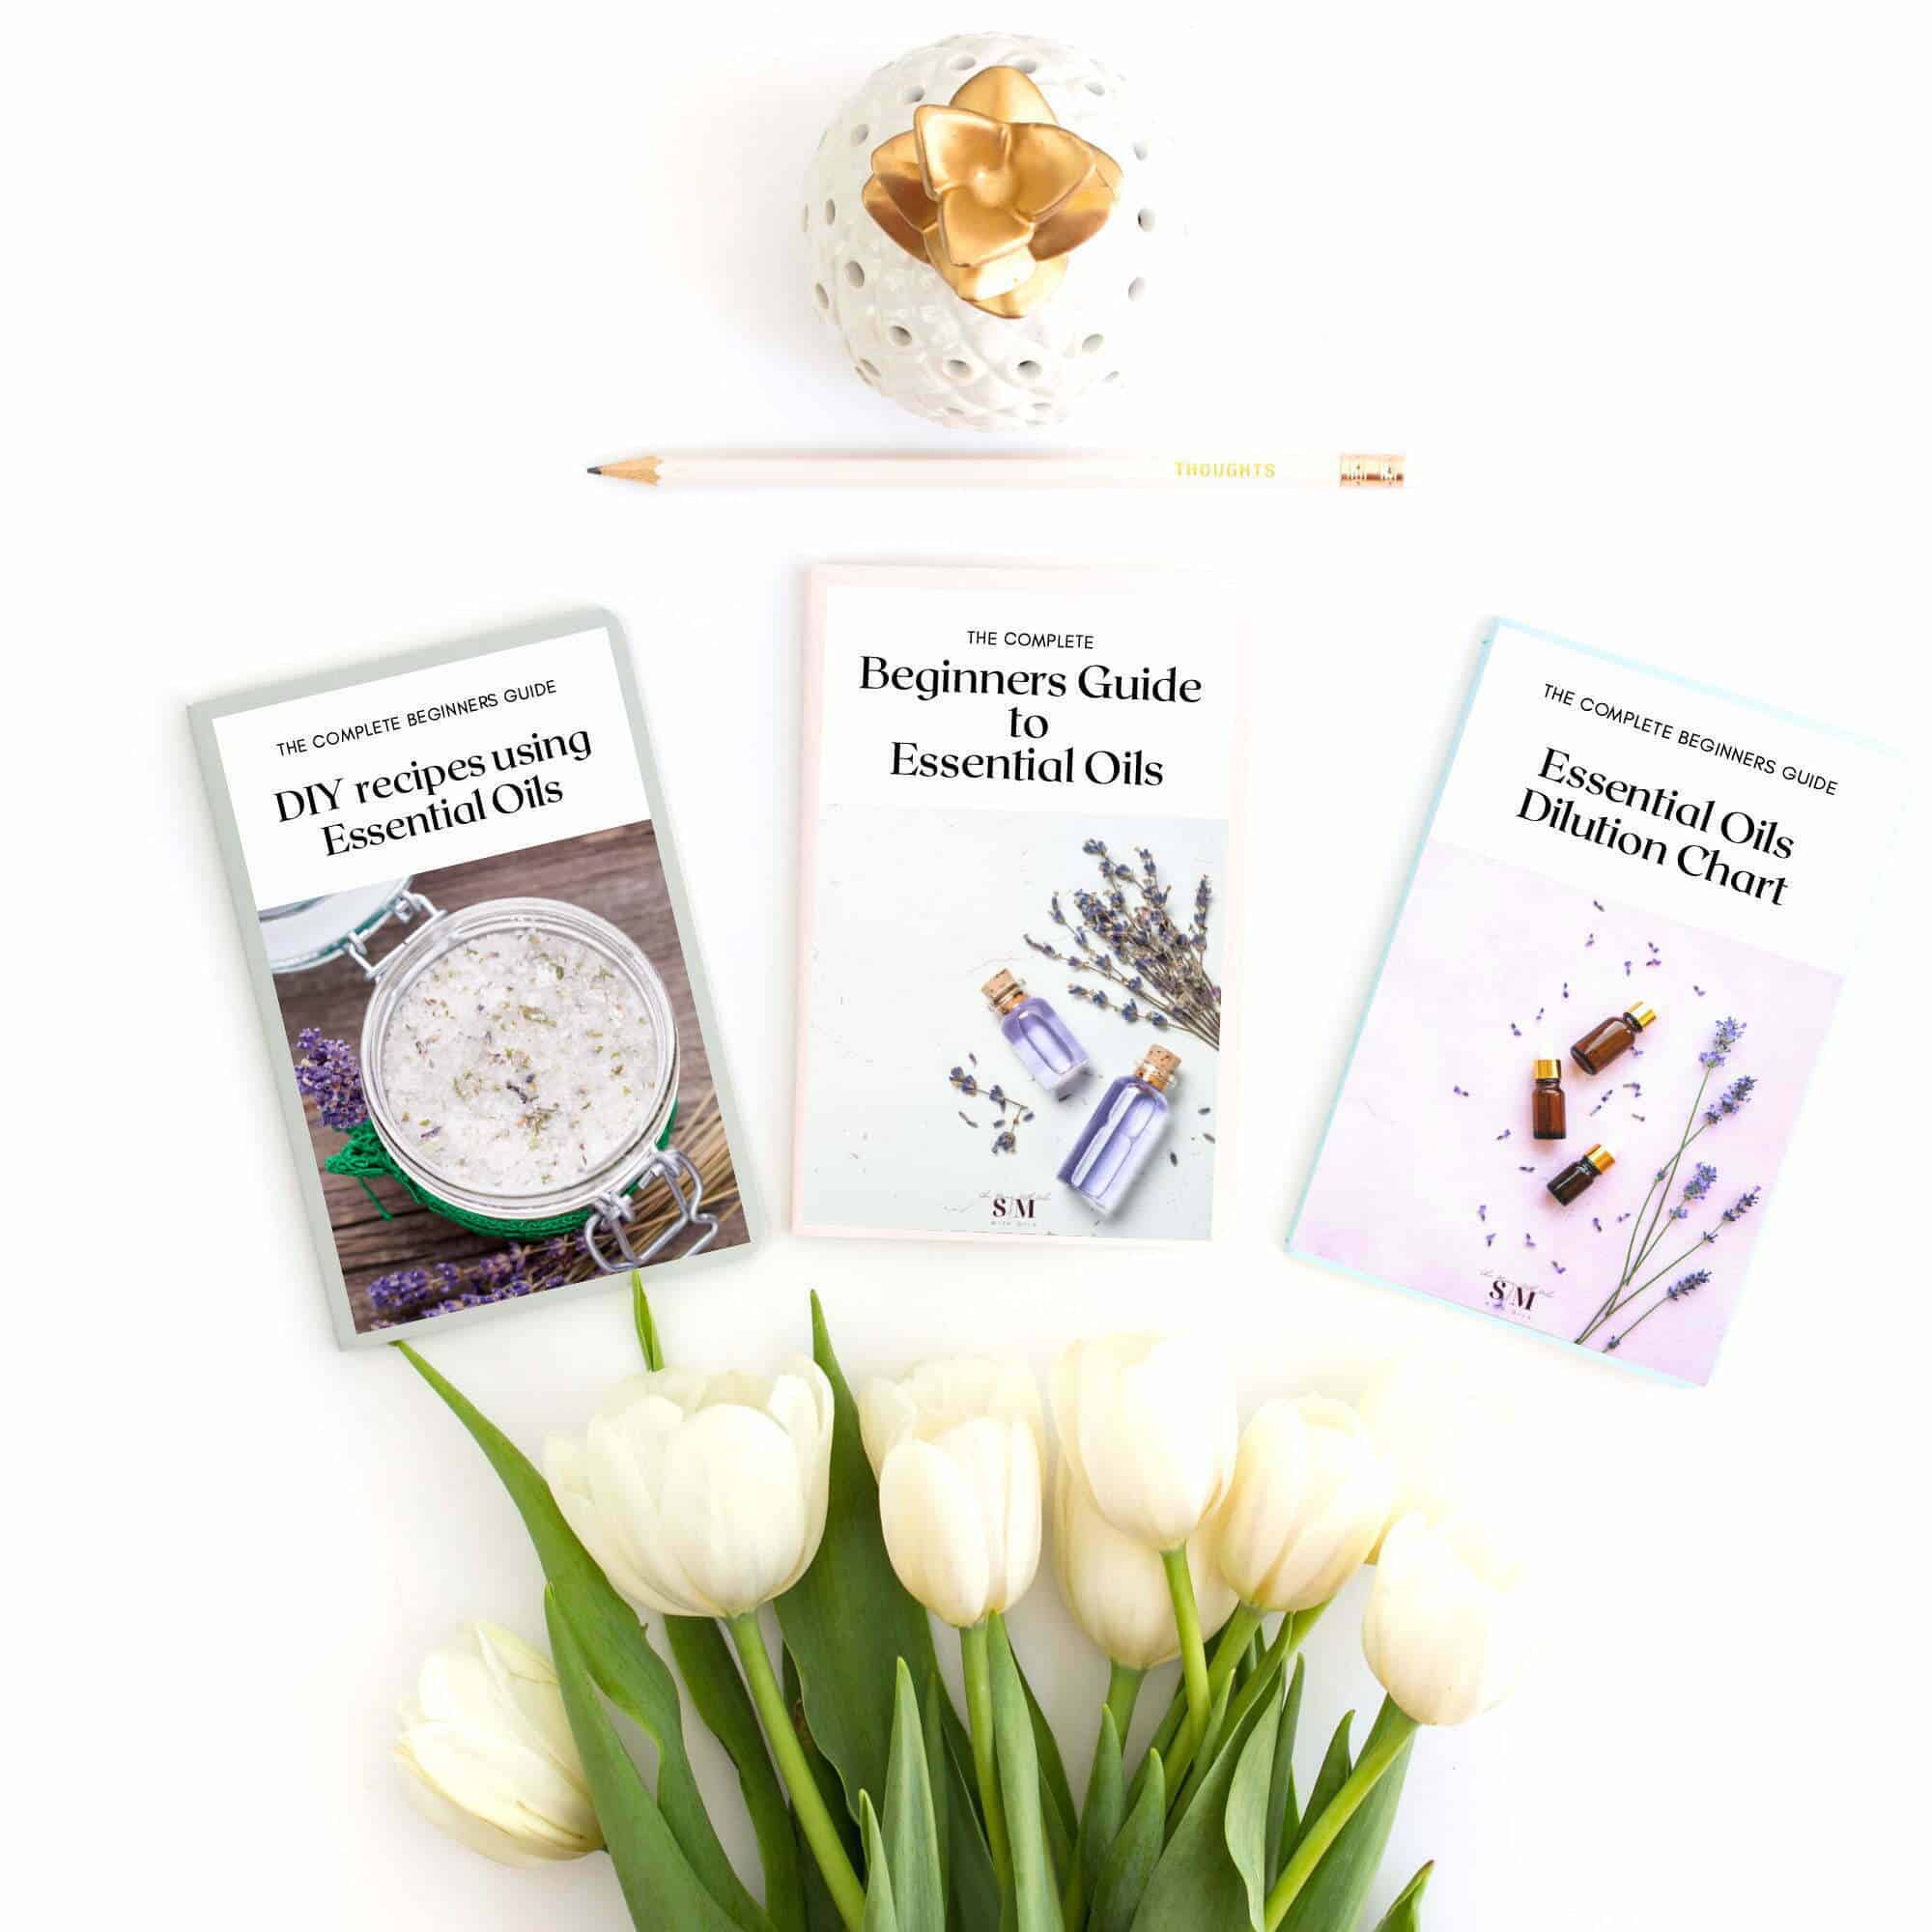
GET THE COMPLETE BEGINNERS GUIDE TO ESSENTIAL OILS!
Are you curious about what Essential Oils are, and what they can do for you and your family?
Did you know that EO have been used for centuries to help support our health and wellbeing?
If you want to learn more, I have created the perfect complete guide to beginners EO users. You can get it on my Etsy shop at a special introductory price.
WHAT ARE THE BEST ESSENTIAL OILS FOR HOMEMADE SOAP
There are so many Oils you can choose to make natural soap at home. You can try the old reliable lavender essential oil or sweet orange or clary sage.
There is no right or wrong here, just go with what you prefer.
Before making handmade soap though, remember that some essential oils are photosensitive (like orange essential oil for example). You might love the citrus scents, but they can cause skin irritation if the skin is exposed to direct sunlight.
ESSENTIAL OIL RECIPES FOR SOAP
Thankfully for us, there are a lot of different Essential oils that you can use in your own homemade soap.
Making homemade soap is actually also fun cause you get to choose how it will smell!
When it comes to choosing a blend of Essential Oils, the choice is solely yours and you can try different combinations, depending on your taste or on the aromatic benefit you desire.
Have fun experimenting with different combinations of Oils, and don’t be afraid to discard the ones you didn’t like next time you make soap!
I’m inviting you to create your own recipe!
USEFUL TIPS FOR CHOOSING ESSENTIAL OILS BLENDS RECIPE FOR SOAP
Although the choice is yours when selecting Essential oils blends for soap making, I can share with you some tips.
A good starting point is to mix Oils that belong to the same category: Florals, Citrus, Woodsy, Herby, etc.
You can also combine Oils from different categories by following these guidelines: floral Oils go well with woodsy and citrus; citrus Oils are fab when mixed with florals, woodsy and minty; earthy and herby are a good match for woodsy and minty; woodsy mix well with practically all Oils; same goes for minty Oils.
ESSENTIAL OILS CATEGORIES
- WOODSY AND EARTHY: Cedarwood, Sandalwood, Frankincense, Cypress, Cinnamon leaf etc;
- MINTY: Spearmint, Peppermint, Eucalyptus;
- HERBY: Rosemary, Basil, Thyme, etc;
- FLORAL: Lavender, Patchouli, Ylang-ylang, Magnolia, Geranium, Jasmin, etc;
- CITRUS: Lemon, Orange, Bergamot, Lemongrass, etc.
HOW MANY DROPS OF ESSENTIAL OIL TO USE IN HOMEMADE SOAP
When using Essential Oils in homemade soap recipes, it is important of course to choose your favorite blend, but you need to know what is the recommended total amount of essential oils that you can use safely.
Also, don’t forget to always use pure Essential Oils.
For lovelygreens.com:
“The EU considers an essential oil usage rate of 3% or less to be safe in wash-off products like soap. For clarification, that 3% of the total amount of soaping oils in a soap recipe by weight. 3% of a one pound batch of soap is a total of 0.48 ounces or 13.6g.”.
Pure, 100% natural Essential Oils are highly potent, and I always recommend to start by using only a few drops in your homemade products. You could always add more at a later stage if you prefer.
HOW TO MAKE MELT AND POUR SOAP: THE PROCESS
Once you have decided on a specific melt and pour base that you would like to use, just gather all the other ingredients needed (see list above), and start making your lovely homemade soap using natural ingredients!
BEFORE YOU START
Always make sure to avoid children getting near very hot surfaces or pots. Scalding is a real danger!
Always use protective gloves and/or glasses.
- On low to medium heat, melt your base by placing it in a large pot.
- Stir continuously until all the soap base has completely melted.
- If you are adding shea butter or cocoa butter or coconut oil or olive oil, add them now, so that they can melt evenly, with the soap base.
- At this point, turn down the heat to the minimum level possible.
- Making sure to keep stirring slowly, add your essential oils of choice, Vitamin E, glitter or natural dye (if using).
- When all the ingredients have been incorporated evenly in the soap base, remove the pot from the heat.
- This is the stage where you need to work fast, as the soap base will start to harden quickly.
- While it is still in a liquid state, pour it into your pre-prepared silicon moulds, making sure to leave some space at the top, to allow the bars to harden and expand a little.
- Wait a few hours, or leave to harden overnight for best results.
- When the soap bars are completely solid, gently remove them from the moulds.
- To store your beautiful creations, you could use paper or carton soap boxes if you have them, or just wrap every bar individually using non-stick paper (the one for baking works perfectly).
Enjoy your handmade soap or give it as a meaningful gift to a special person in your life.
USING DRIED FLOWERS, HERBS, OAT FLAKES ETC.
If you want to add any of the above to create a beautiful top layer for your homemade soap, remember to place those dry ingredients at the bottom of the silicon moulds.
Have them ready before starting making your soap, to avoid delays when pouring the hot liquid soap base in the moulds (remember that the soap will start to harden very very quickly).
If you would like to learn how to make liquid soap and hand sanitizer using essential oils and other natural ingredients, why don’t you check this post:
HOW TO MAKE HOMEMADE SOAP FOR BEGINNERS USING NATURAL INGREDIENTS: CONCLUSIONS
I hope you find this post helpful, and if you were still unsure about giving homemade soap a go, please just give it a try!
It is so easy and so fun to make that you will wonder why you didn’t try earlier!
As always, feel free to leave a comment below and let me know if you try any of my recommendations.
Till next time, Dee.
IMPORTANT: when using Essential Oils, make sure to use only CPTG Certified, Pure, Tested Grade ones, like Doterra Essential Oils. The content of this blog post and any information provided here has not been evaluated by any government entity or medical practitioner. It is NOT intended to diagnose, treat, cure or prevent any disease, illness or condition. It is NOT intended to be a substitute for medical counselling. If you are pregnant, breastfeeding, or suffering from any medical condition or illness or injury, you SHOULD consult a qualified healthcare professional before using any product.
Hi, I’m Dee!
Mom of three; printables creator, natural solutions, simple living and homemade food enthusiast; “Outlander” fanatic.
When I’m not busy writing and designing, you can always find me covered in a cloud of flour in the kitchen, playing and crafting with my children, or making up some blends with my Essential Oils. Also I’m practically obsessed with Crystals and reading during my spare time.
Come along on our crazy journey as a family living in the countryside of Ireland!